
Last updated on September 20th, 2025
It seems that everyone is talking about pinsa these days. But what is pinsa? How is it different from pizza? Can I make it at home?
You probably thought you had tried every pizza out there – thin crust, Neapolitan, deep-dish, stuffed crust, calzone. But no, you missed one – the holy pinsa romana from Italy’s capital city of Rome!
Characterized by a high hydration and mixed flour crust, pinsa is defined by its unique flavor, cloud-like texture with a crispy crust and easy digestion.
Pinsa is all the rage these days and for good reason. Let’s take a look at:
- why pinsa is so popular
- what exactly pinsa is
- how to make, serve and enjoy pinsa with friends and family (at home or while you’re on vacation in Italy)
Check out more Delicious Dinner Recipes That We Make in Italy.
Heading to Rome? Check out my top spots for pinsa romana in Rome.
Jump to Section
Pinsa Pronunciation
Pinsa is pronounced peen-sah in Italian. The word pinsa is derived from the Latin pinsere, meaning ‘to push’, referring to the method of pushing or rolling the dough out by hand.
Listen to the pronunciation of pinsa here:
What Is Pinsa?
Pinsa, also known as pinsa romana (Roman Pinsa), is a very light and airy pizza or flatbread, most traditionally shaped into a long, oval shape and topped with various toppings, just as a normal pizza would be.
Characterized by a high hydration and mixed flour crust, pinsa is defined by its unique flavor, cloud-like texture with a crispy crust and easy digestion.
Fact: You will also see pinsa spelled pinza, which is the same thing but not the original or traditional way of spelling it in Italian.
Pinsa Vs Pinsa Romana
Pinsa is exactly the same thing as pinsa romana. Sometimes, they are confused and thought to be two, independent types of pizza. Rather, pinsa is just the abbreviated name for pinsa romana.
How Do They Do It? Read how Italians stay so svelte while eating pizza and pasta every day.
What Is Pinsa Bianco?

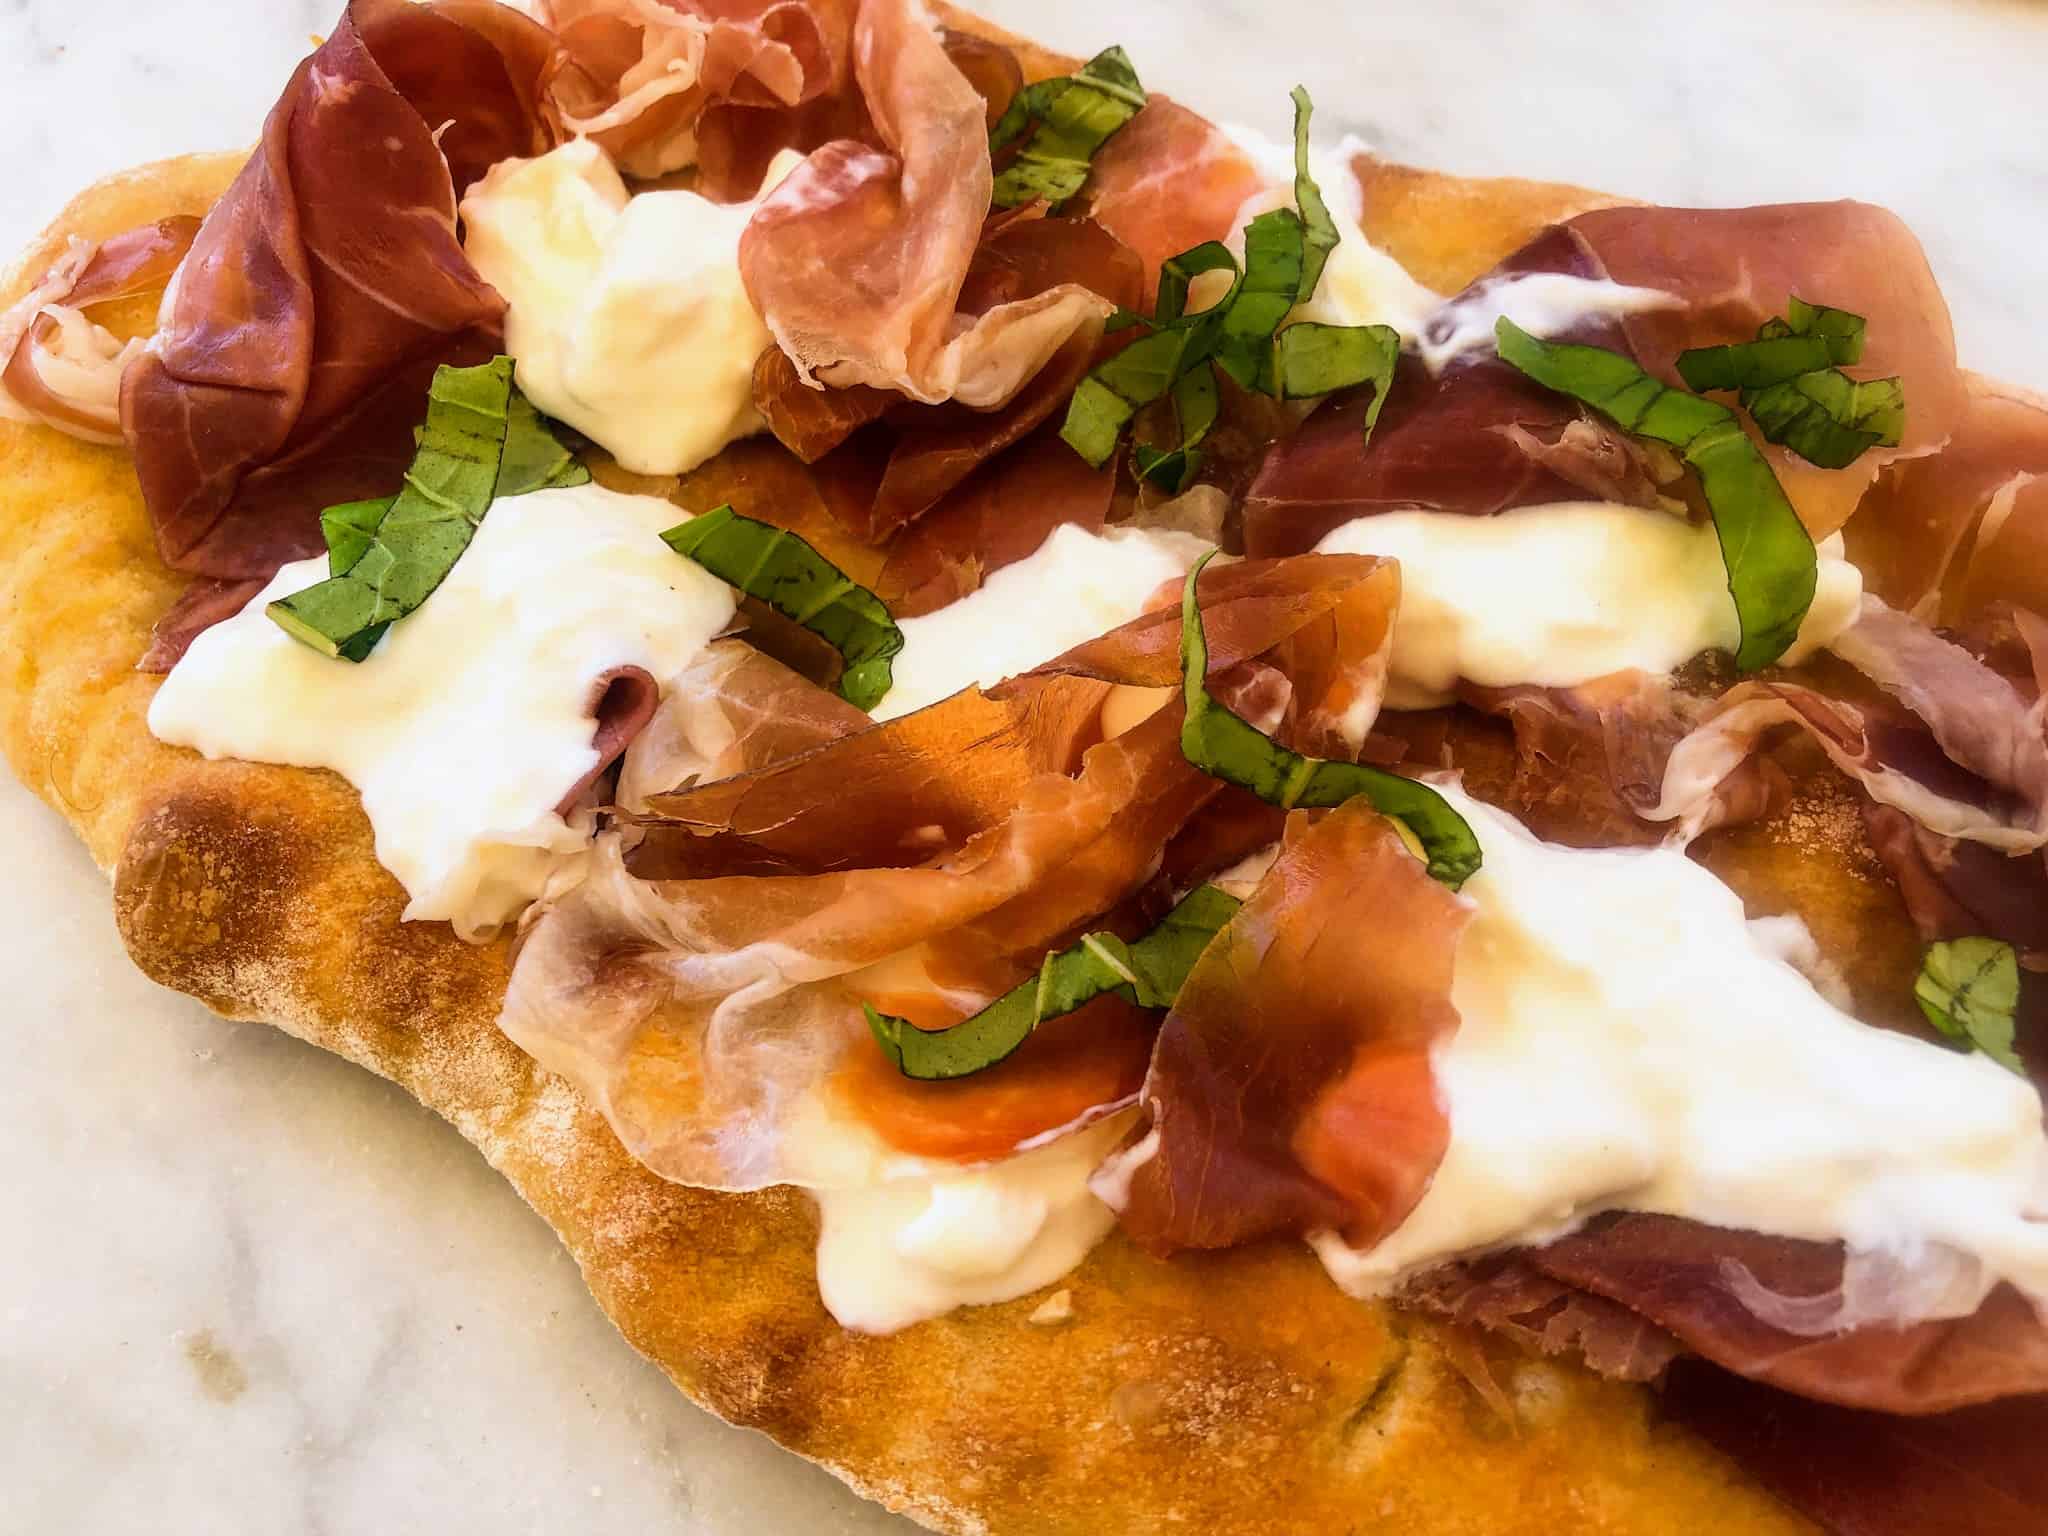
Pinsa bianco means there is no tomato sauce on it. In Italy, you can buy pinsa bianco, meaning it’s made with just oil and salt. Other times, it will be made bianco and also have other toppings such as cheese (I love it with burrata!) but never with fresh tomato or tomato sauce.
Origins of Pinsa

Pinsa is thought to be some of the oldest forms of pizza ever to have existed in Italy, dating back centuries.
Pinsa has been a favorite pizza snack in Rome (Lazio) forever, most famously known as one of Rome’s most beloved street foods. Today, the recipe has been popularized by the Italian baker, Corrado di Marco. In fact, his recipe is the base for all pinsa recipes, including this one.
Difference Between Pinsa and Pizza

| Pinsa Dough | Pizza Dough |
| soy, whole wheat and rice flour | wheat and white flours |
| made with cold water | made with lukewarm water |
| oval shape | round shape |
| long fermentation (minimum 48 hours) | shorter fermentation (minimum 24 hours) |
| baked at a lower temperature | baked at a higher temperature |
| higher hydration | more flour |
| traditionally flattened by hand | traditionally tossed by hand |
| uneven, rustic surface | flat, even surface |
| high protein, low-gluten, lower in calorie | lower protein and higher gluten and calorie |
| light, soft, pillowy, airy dough | dough varies depending on region (flat, puffy, crusty) |
| easy on digestion | more difficult to digest |
The most apparent difference is in its shape. Pizza is most traditionally round but a pinsa is a long, oval shape.
Pinsa dough is also significantly different from pizza dough, made with more hydration and from a combination of soy, rice and wheat flour. This creates a very light, pillowy dough that is quite puffy.
Pinsa dough is pushed out by hand, not thrown in the air, preserving all the naturally occurring air bubbles. When pizza is thrown, the natural air pockets can deflate, creating a more even, uniform texture.
The pinsa dough is also fermented for a longer time, upward of 72 hours, but this doesn’t define a pinsa pizza because regular pizza can also have a long fermentation. Because of this long fermentation, the dough is much more complex and easier to digest when compared to regular pizza dough.
Health Benefits Of Pinsa

Pinsa pizza is made with a combination of non GMO flours in Italy, which makes for a healthier and more flavorful crust. The combination of flour makes the pinsa lower in starch, gluten and sugar.
The long fermentation process (up to 72 hours) and high hydration level (around 80%) makes the pinsa easy to digest. When pinsa dough is left to ferment for such a long period, the complex sugars or starches and proteins are broken down much easier, thus making it easier to pass through the digestive system.
How To Eat Pinsa

Pinsa is most commonly enjoyed “by the slice” (but it’s not sliced, rather, cut into pieces) and sold by weight. It’s a popular quick lunch option in Rome or street food enjoyed by students and children for snacks or merenda.
Pinsa romana can also be ordered whole at a sit-down restaurant in Rome although it’s still much more common to order it by weight at bakeries or forni and enjoyed slightly warm or at room temperature.
In Italy we eat pinsa with our hands, not usually with a knife and fork. When Italians usually order whole pizza pies at a restaurant, they will start eating their pizza with a knife and fork and then may or may not switch to using their hands.
Read More: Do Italians Eat Pizza With a Fork? and How Do Italians Eat Pizza?
Ingredients For Pinsa

- 3-3/4 cups (450 grams) bread flour, more for dusting
- 1/4 cup plus 1 tsp (25 grams) white rice flour
- 1/3 cup plus 1 tbsp (25 grams) soy flour
- 1 ⅔ cups (400 ml) cold water (refrigerator temperature)
- ¾ tsp active dry yeast
- 1 teaspoon fine sea salt
- 1 tbsp extra-virgin olive oil, plus more for drizzling
- Toppings of your choice
Flour

The combination of rice, bread and soy flour is what defines this pizza. It adds structure and taste, allowing this dough to hold up and maintain a high hydration. This in turn creates a light, airy crust.
Water
It’s important to use cold water here because this is what helps slow the fermentation process, allowing for a long rise in the refrigerator for up to 48 hours.
If you don’t have cold water, you can pop a couple of ice cubes in some water and then measure out what you need once the water is cold.
Olive Oil
In this recipe, like all Italian pizza recipes, we are using extra virgin olive oil. If that is not available to you, feel free to use any olive oil you have. For our full guide on purchasing olive oils, read 15 Best Italian Olive Oils – To Enjoy in Italy & Bring Home as a Souvenir and Best Italian Olive Oil Brands in America – Where to Buy Them and How to Store Them.
How To Make Pinsa
It’s really important you use a scale for baking, especially when making doughs with different flours like in pinsa. If you don’t have one, you should invest in one. It will improve your ease of baking and reliability immensely!
Combine the bread, rice and soy flours in a large bowl and set aside.
In a stand mixer fitted with a dough hook, add the cold water and the yeast. Mix well.
Slowly add the flour mixture and mix just until combined.
Add the salt, olive oil and mix on medium speed for about 8 minutes until the dough is smooth. The dough will seem very liquidy, which is normal in high hydration doughs like this.

Let rise at room temperature for two hours, performing a series of four folds every 30 minutes by lifting up one corner of the dough with a wet hand, pulling it up and bringing it back down on top of the dough on the opposite side. Turn the bowl a quarter of a turn and repeat 3 more times until all the dough has been folded upon itself. Keep covered with plastic wrap.
Transfer to a lightly greased bowl, cover with plastic wrap and let rise in the refrigerator for at least 24 hours and up to 48 hours.

About 2-3 hours before you want to bake your pinsa, turn the dough out onto a very well-floured surface. Divide it into 4 equal pieces with either a floured knife or a dough scraper/cutter.
One at a time, fold the corners into the center to form a nice, uniform ball. Flip over so the seam side is down, being careful not to flatten. Repeat with the remaining pinsa dough balls.

Generously flour a baking sheet and gently place the pinsa dough balls on it, being sure they have space to grow in size (proof). Sprinkle well with flour and cover the baking sheet with plastic wrap or a kitchen towel. Allow the pinsa dough to rise at room temperature for 1-3 hours or until doubled.
About an hour before baking, heat the oven to about 500°F/260°C

Gently place one dough ball on a well floured surface and working from the center outward, shape the dough into an oval by pressing your fingers into the dough and gently stretching or pushing it outwords.

Carefully move the pinsa dough to a parchment lined baking sheet and top with your toppings. Ingredients such as prosciutto crudo and fresh mozzarella di bufala shouldn’t be added until after the pinsa has been baked.

If you are making pinsa bianca or plain, oiled pinsa, generously drizzle with olive oil and salt before baking.
Bake for 10-15 minutes until the crust is golden and the pinsa pizza feels firm on the bottom.

Let cool slightly and finish topping with any additional ingredients, including a drizzle of olive oil. Serve immediately or at room temperature.
Toppings For Pinsa

The sky’s the limit! The topping options for pinsa are endless, just as with any other kind of pizza.
Pinsa is 100% customisable so be creative or stick to tradition. If you have dietary restrictions, picky eaters or you like to eat in season, pinsa pizza is the best for any of these by adapting the toppings to fit your needs.
Curious about what we put on our pizza in Italy? Read Authentic Italian Pizza Toppings.

Popular topping combinations for pinsa:
- with pistachios, mortadella and taleggio
- with arugula and fresh cherry tomatoes
- with fresh tomatoes and mozzarella di bufala
- with tomato sauce and mozzarella
- with pecorino romano, mozzarella and black pepper
- with prosciutto and mozzarella
- with pesto and cherry tomatoes
- with provolone, stewed mushrooms and onions
- with thin slices of potatoes and pecorino romano (check out my potato pizza recipe)
- with zucchini and basil
- with grilled vegetables such as peppers and onions

Note: If you are adding any kind of cold cuts, salad or herbs, add them after the pinsa has been baked.
Substitutions For Pinsa
There really is no substitution for pinsa but you should go wild and be creative with the toppings. The specific flour combination is what defines this pizza, making it lower in sugar, carbohydrates and gluten so changing it isn’t advised.

Use any kind of pre-mixed pinsa pizza flour that is sold commercially. It should have the correct proportions of bread, rice and soy flour already mixed for you.

I have also seen in Italian grocery stores pre-made pinsa dough already cooked and ready to top with fresh ingredients. It makes for a really easy dinner, ready in just 6 minutes!
Notes and Tips For Making Pinsa

- Pinsa pizza dough is quite wet and can be tricky to work with. This is normal. Keep your board and hands well floured when working!
- The longer you let your pinsa pizza dough rise, the more flavorful the dough will be.
- Use an oven thermometer for an accurate bake temperature.
- Feel free to bake your pinsa pizza in a brick fired oven.
- The time it takes to bake your pinsa will depend greatly on the type of toppings you have added. If you are using ingredients such as prosciutto that are not added until after the pinsa is baked, it might take less time. If, however, you are using cheese, grilled vegetables and tomatoes, the bake time may be longer.

Roman Pinsa
Ingredients
- 3 ¾ cups bread flour (450 g), more for dusting
- ¼ cup white rice flour plus 1 tsp (25 g)
- ⅓ cup soy flour plus 1 Tbsp (25 g)
- 1 ⅔ cups cold water (400 ml), refrigerator temperature
- ¾ tsp active dry yeast
- 1 tsp fine sea salt
- 1 Tbsp extra-virgin olive oil plus more for drizzling
Instructions
- Combine the bread, rice and soy flours in a large bowl and set aside.
- In a stand mixer fitted with a dough hook, add the cold water and the yeast. Mix well.
- Slowly add the flour mixture and mix just until combined.
- Add the salt, olive oil and mix on medium speed for about 8 minutes until the dough is smooth. The dough will seem very liquidy, which is normal in high hydration doughs like this.
- Let rise at room temperature for two hours, performing a series of four folds every 30 minutes by lifting up one corner of the dough with a wet hand, pulling it up and bringing it back down on top of the dough on the opposite side. Turn the bowl a quarter of a turn and repeat 3 more times until all the dough has been folded upon itself. Keep covered with plastic wrap.
- Transfer to a lightly greased bowl, cover with plastic wrap and let rise in the refrigerator for at least 24 hours and up to 48 hours.
- About 2-3 hours before you want to bake your pinsa, turn the dough out onto a very well-floured surface. Divide it into 4 equal pieces with either a floured knife or a dough scraper/cutter.
- One at a time, fold the corners into the center to form a nice, uniform ball. Flip over so the seam side is down, being careful not to flatten. Repeat with the remaining pinsa dough balls.
- Generously flour a baking sheet and gently place the pinsa dough balls on it, being sure they have space to grow in size (proof). Sprinkle well with flour and cover the baking sheet with plastic wrap or a kitchen towel. Allow the pinsa dough to rise at room temperature for 1-3 hours or until doubled.
- About an hour before baking, heat the oven to about 500°F/260°C
- Gently place one dough ball on a well floured surface and working from the center outward, shape the dough into an oval by pressing your fingers into the dough and gently stretching or pushing it outwords.
- Carefully move the pinsa dough to a parchment lined baking sheet and top with your toppings. Remember that ingredients such as prosciutto crudo and fresh mozzarella di bufala shouldn’t be added until after the pinsa has been baked.
- If you are making pinsa bianca or plain, oiled pinsa, generously drizzle with olive oil and salt before baking.
- Bake for 10-15 minutes until the crust is golden and the pinsa pizza feels firm on the bottom.
- Let cool slightly and finish topping with any additional ingredients, including a drizzle of olive oil. Serve immediately or at room temperature.
Notes
- Pinsa pizza dough is quite wet and can be tricky to work with. This is normal. Keep your board and hands well floured when working!
- The longer you let your pinsa pizza dough rise, the more flavorful the dough will be.
- Use an oven thermometer for an accurate bake temperature.
- Feel free to bake your pinsa pizza in a brick fired oven.
- The time it takes to bake your pinsa will depend greatly on the type of toppings you have added. If you are using ingredients such as prosciutto that are not added until after the pinsa is baked, it might take less time. If, however, you are using cheese, grilled vegetables and tomatoes, the bake time may be longer.
Pinsa FAQ
The biggest difference is that pizza is made with wheat flour while pinsa pizza is made with a combination of bread, rice and soy flour, making it lower in gluten and higher in protein.
Pinsa is a kind of hand-pressed pizza dough from Rome. Instead of being thrown into the air or rolled out, the dough is gently pushed out with the tips of your fingertips. In fact, the word pinsa comes from the latin word pinsere meaning “to push”.
The dough for pinsa is made from soy, rice and bread flour. Bread flour is the main flour while soy and rice account for just a small percentage.
Pinsa pizza is not gluten-free but it does have less gluten, sugar and carbohydrates. Because of its high hydration and long fermentation, pizza pinsa is generally easier to digest than other pizzas.
Pinsa is Roman flatbread with a light, pillowy crust made by the combination of flour used in the dough, the long fermentation and high-hydration.
Yes, you can use pinsa dough as a substitute for focaccia dough in foccaccia art.


Great